louisetreloarrecipes

Tried and tested recipes that my family love

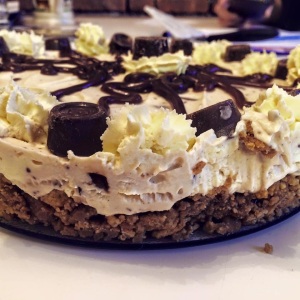
Rolo Caramel Cheesecake — July 15, 2015

Rolo Caramel Cheesecake

image

Biscuit Base

– 150g Digestives
– 150g Foxs Vanilla Crunch biscuits
– 125g butter
Cheesecake Filling
– 500g cream cheese, I used 250g mascarpone, 250g full fat Philadelphia – 1 tsp vanilla extract
– 100g icing sugar
– 150g caramel – I use Carnations Caramel
– 300ml double cream (buy a 600ml tub)
– 175g Rolo sweets, chopped up
Decorations
– Caramel drizzle
– Rolo sweets
– Whipped vanilla cream

Method


Melt butter in Large Micro Cooker.

Use Manual Food Processor to blitz both sets of biscuits into crumbs.

Blend with butter and press firmly into Springform Pan. Chill in fridge (or freezer).

Pour double cream into Small Batter Bowl and whisk until stiff peaks form using Double Balloon Whisk.

In 2 litre Stainless Bowl, whisk together the cream cheeses, vanilla, icing sugar and caramel until smooth using Stainless Whisk.

Fold double cream into the cheese mixture. Do this carefully to maintain the lightness.

Chop Rolos into chunks using the Food Chopper.


Add Rolos carefully into mixture.


Spread mixture over biscuit base. Pop back into the freezer until set or leave in fridge for 5-6 hours or overnight.


Pour remaining double cream into Small Batter Bowl and whisk until stiff peaks then fill Easy Accent Decorator with closed star tip.

Decorate the cheesecake with leftover caramel, cream stars and any spare Rolos
The Pampered Chef ® Roasted Chicken, Onion & Rosemary Pizza Recipe — July 8, 2015

The Pampered Chef ® Roasted Chicken, Onion & Rosemary Pizza Recipe

image

2 packets (145g each) pizza base mix

About 250 ml warm (hand hot) water

250 g skinless, boneless cooked chicken (approx 2 breasts)

1 red onion

Small bunch fresh parsley

2 tablespoons olive oil

2 cloves garlic

Few sprigs fresh rosemary

1/8 teaspoon salt, or to taste

1/8 teaspoon freshly ground black pepper, or to taste

200g  ready grated mozzarella cheese

50g piece parmesan cheese

1. Preheat oven to 200°C/ fan 180°C/Gas 6. Lightly spray Medium Round Stone with

sunflower oil; set aside. Place pizza base mix (use both sachets) in Classic Batter

Bowl. Add enough warm water, mixing to form soft dough using Bamboo Spoon.

Knead dough on lightly floured surface 5 minutes or until smooth. Place pizza dough

onto centre of prepared baking stone; roll dough out to within 5 mm of edge of baking

stone using Baker’s Roller™, making edges slightly thicker than centre. Set aside in

warm place 15 minutes.

2. Coarsely chop chicken using Utility Knife. Take rosemary leaves off stems and chop

with Food Chopper. Slice half onion with Utility Knife and chop other half with Food

Chopper. Snip parsley with Kitchen Shears. Grate the Parmesan with Microplane

Fine Grater.

3. In Classic Batter Bowl, toss together chicken, Parmesan, onion, parsley, olive oil,

garlic pressed with Garlic Press, rosemary, salt, black pepper and 140 g of the

mozzarella cheese. Spread chicken mixture evenly over pizza base to within 5 mm of

edge. Sprinkle with remaining mozzarellacheese.

4. Bake about 25 minutes or until cooked and golden brown. Place baking stone on

Stackable Cooling Rack; cool 10 minutes. Cut into wedges with Pizza Cutter.

Yield: Serves 8

Per serving: Energy 962 kJ/229 kcal; Protein 15.8 g; Carbohydrate 15.9 g; Fat 11.8 g;

Saturated Fat 4.7 g; Fibre 0.7 g; Salt 0.5 g

Cook’s Tip: 1 teaspoon dried rosemary may be substituted for 1 tablespoon fresh rosemary

leaves.

Cooked turkey or ham may be substituted for the chicken.

Use a mixture of grated Cheddar and mozzarella cheeses, if preferred.

© The Pampered Chef—United Kingdom, Ltd.

Mushroom Barley Burgers, adapted from “Vegetarian Food for Kids”, by Laura Washburn — May 31, 2015

Mushroom Barley Burgers, adapted from “Vegetarian Food for Kids”, by Laura Washburn

These are also good ones, but they take a bit longer!

65g Pearl Barley

1 slice wholemeal bread

1 small onion

225g mushrooms

1 tbsp soy sauce

50g grated cheddar cheese

2 eggs

1)  Rinse and drain pearl barley, then place in saucepan in cold water.  Bring to boil and simmer for 35 minutes until tender.

2)  Meanwhile, put bread in Manual Food Processor (MFP) and whizz into breadcrumbs.  Set aside.

3)  Finely chop onion in MFP, and fry off in saute pan until soft.

4)  Finely chop mushrooms in MFP, adding a bit of parsley if liked.  Place in bowl with breadcrumbs.

5)  Beat eggs, then add to the breadcrumbs & mushrooms.  Add the drained barley, onions, soy sauce and cheese and mix all together.

6) Using large scoop, scoop balls onto large frying pan.  My brand new square griddle pan is perfect for this!  😉

Flatten slightly with Classic Scraper and fry for 3-4 minutes on each side, turning carefully once.

We ate these with potato wedges, guacomole and nacho cheesy dip, and tomato ketchup for the girls of course!! So so delicious!!!!

Veggie Bean Burgers —

Veggie Bean Burgers

burger n chips

It has been my mission for a while now to find easy, nutritious burgers that we can make ourselves, and that the girls will enjoy.  I think we’ve found it in these!  They are taken from the BBC Good Food site, a recipe by Jo Ingleby (http://www.bbc.co.uk/food/recipes/veggie_bean_burgers_for_53280), and we made ours with carrots and kidney beans, and served with homemade chips baked in the oven.  The healthiest burger and chips ever!

Ingredients

Preparation method

  1. Preheat the oven to 200C/180C Fan/Gas 6.
  2. Mash the beans or chickpeas as much as you can either with a Mix n masher in a bowl.
  3. Add the mashed vegetables and garlic and any herbs, spices or tahini that you want to.  Mix well and add lemon juice, spices or pepper to taste.
  4. Get the children to shape the mix into four large burgers with wet hands, or make 12 smaller “falafels” – kids have the perfect sized hands for this. Flatten the balls slightly.  Alternatively, use the measure all cups to make burgers exactly the same size, without getting your hands messy, or the Large Scoop if you want small ones!
  5. If you like, you can coat them with sesame seeds, crushed crackers or breadcrumbs for extra crunch.
  6. Place on Medium Round Stone and pop in the oven and cook for 20-30 minutes.  Allow to cool a little before serving.
Warm Chocolate Hazelnut Cake — May 22, 2015

Warm Chocolate Hazelnut Cake

Just found this recipe from when I first started PC-ing.  I may need to try it out, purely for research purposes, you understand.  🙂
 55 g (2 oz) hazelnuts
 375 g (13 oz) hazelnut chocolate spread, divided
 300 ml (1/2 pint) water
 4 tablespoons sunflower oil
 3 eggs
 1/2 teaspoon vanilla extract
 1 packet (500 g) devil’s food cake mix
 55 g (2 oz) plain chocolate chips, coarsely grated (optional)
Vanilla ice cream or whipped cream and prepared fresh fruit such as strawberries, blueberries and raspberries (optional)
1. Brush bottom and sides of Rice Cooker Plus with oil using Chef’s Silicone Basting Brush. Coarsely grate 25 g (1 oz) of the hazelnuts into rice cooker using Deluxe Cheese Grater, turning rice cooker to coat completely. Allow excess grated nuts to evenly coat bottom; set aside. (If hazlenuts are chopped already, will not have to do this step)
2. Place 200 g (7 oz) of the hazelnut chocolate spread in Classic Batter Bowl. Microwave on HIGH 30-40 seconds or until slightly melted. Gradually add water, whisking using Stainless Whisk. Add oil, eggs and vanilla extract; whisk until smooth. Add cake mix and coarsely grated chocolate chips; whisk 2-3 minutes or until smooth and thick.
3. Pour cake mixture into prepared rice cooker, spreading evenly. Do not cover with lid. Microwave on HIGH about 9 minutes or until a skewer inserted into centre comes out clean (cake may appear slightly wet on top – do not over-cook cake). Remove cake from microwave; let stand 5 minutes. Invert cake onto large plate. Place remaining hazelnut chocolate spread in Prep Bowl and microwave on HIGH 1-1 1/2 minutes or until melted and warm, stirring after every 30-second interval; spread or drizzle over top and sides of cake. Coarsely chop remaining hazelnuts using Food Chopper; sprinkle over cake. Serve immediately using Slice ‘N Serve®; serve with ice cream and fruit, if desired.
Vegan Butternut Squash & Sweet Potato Red Thai Curry — May 21, 2015

Vegan Butternut Squash & Sweet Potato Red Thai Curry

This is a new one that I need to try!!

Thai Curry Paste

Ingredients

3 red chillis

3 shallots

½ red pepper

zest of a lime

stalks from 20g fresh coriander

1 tsp ground coriander

2 garlic cloves

1 tsp black pepper

Peel the shallots and place in the Manual Food processor.

Remove the stalks from the chillis, cut in half and put in the Manual Food Processor.

Using the Executive Utility Knife cut the pepper in half. Chop into quarters and put in the Manual Food Processor.

Grate the lime and put the zest into the Manual Food Processor.

Using the small Adjustable Measuring Spoon, put the ground coriander into the Manual Food Processor

Using the Garlic Press, crush the garlic and put in the Manual Food Processor.

Grind the black pepper into the mixture.

Blend all the ingredients until it becomes like a paste.

Curry Ingredients

1 large onion

500g sweet potato

500g butternut squash

250g flat mange tout

4 medium tomatoes

600g coconut milk

½ sachet coconut cream

200ml vegetable stock

2 tblsp soy sauce

handful of fresh basil

juice of 1 lime

Using the Food Chopper, Chop the onion and put in the Rice Cooker Plus.

Peel the sweet potato using the vegetable peeler and cut into 1 inch pieces using the Utility Knife. Put into the Rice Cooker Plus.

Peel the butternut squash using the Santuku Knife. Using the Crinkle Cutter, cut into bite sized pieces. Place into the Rice Cooker Plus, then microwave on high for 5 minutes.

Meanwhile measure 4 tblsp of curry paste and put into the Rectangular baker with the coconut milk.

Put in the oven at 200 degrees.

Trim the mange tout with the Large Kitchen Shears.

Using the Vedgie Wedger wedge the tomatoes and leave in the Large/small Batter Bowl.

Using the Citrus Press, juice the lime and put in with the tomatoes.

When the veg has finished in the microwave put in the Rectangular Baker with the coconut milk and add the vegetable stock.

Put  the soy sauce into the Rectangular baker.

Put in the oven for approx. 20 mins. After 20 mins remove and add the tomatoes, mange tout and the coconut cream.

Season with salt and put back in the oven until the vegetables are soft (approx. 10 mins).

While the curry is cooking, measure 2 cups of rice, using the Easy Read Measuring Cups into the Rice Cooker Plus along with 4 cups of boiling water. Stir and then cook on high for 10 mins. Remove from the microwave and leave to stand for 2 mins before serving.

Fruity Shortbread pizza — May 9, 2015

Fruity Shortbread pizza

fruity pizza

I’ve seen varieties of this made before, but when I came to try it for myself, I couldn’t find a recipe that fit the ingredients I had in the fridge!  So, this is slightly made up, although the shortbread part is from the Bero cookbook.

250g plain flour

75g sugar

175g butter

Tub of ricotta cheese (approx 250g)

Half cup of icing sugar

Half cup of cream cheese

Blueberries, strawberries, raspberries, kiwis, banana,…. to decorate.

1)  Preheat oven to 160C.

2)  Rub together flour, sugar and butter, and knead well to form a smooth dough.  Roll out onto Medium Round Stone with Bakers Roller, until it forms a large circle on the stone.  (My stone is well seasoned, so I didn’t use any oil or parchment paper – if yours is new, baking parchment may be needed).

3)  Bake for 15-20 minutes, or until light golden brown all over.  Leave to cool.  Using the large spreader, loosen the shortbread from the stone.

4)  Mix together the ricotta, cream cheese and sugar until smooth.  A little vanilla extract might be nice too!  Spread over the cooled shortbread.

5)  Arrange the fruit over the top  – we did ours on the 4th July weekend, hence the attempt at the US flag.  Serve immediately!!

Mexican Chicken and Spiced Potato Wedges —

Mexican Chicken and Spiced Potato Wedges

Mexican Chicken

5 Chicken breasts (skinless)

1 large or two small red onions

1 red pepper

1 green pepper

1 red chilli

2 cloves garlic

1 lime

1 jar of salsa

2 tablespoons sugar

Tin of tomatoes

Small jar tomato puree

Packet of Mexican spice mix -taco/ enchilada/ fajita (1 Tbsp reserved for potato wedges)

1 chicken stock cube

Sour cream and grated cheddar cheese to serve (optional)

Mexican Spiced Wedges

450g potatoes

1 Tbsp reserved Mexican Spice Mix

1 Tbsp olive oil

Method

Preheat oven to 220 (200 fan oven) 

Wedge potatoes, place in Rice Cooker, or Large Micro Cooker with a tablespoon water and microwave on high 10 mins (for a 600w microwave. Reduce cooking time for more powerful microwaves). Drain and shake gently. Add spices and oil and mix to coat. Put on Medium Round Stone.

For the Mexican Chicken, slice the chicken  and peppers into thin slices with Forged Knife on Flexible Cutting Mat. Chop onion and chilli with Food Chopper, crush garlic with Garlic Crusher, zest lime with Microplane and juice with Citrus Press. Open Tomato Puree with Smooth Edge Can Opener. Place all the Mexican Chicken ingredients into a rectangular baker and cook for 15 mins. Take out and stir and then put wedges in the oven. Cook wedges and Mexican chicken for 20 mins until chicken is cooked through and wedges golden and crisp.

Put cheese and sour cream in bamboo bowls to serve.

The most dangerous cake in the world —

The most dangerous cake in the world

This cake has been referred to as the most dangerous cake in the world.  Do you know why?  It’s because you now know that you are never going to be any more than 5 minutes away from the most delicious chocolate cake.  It goes beautifully in the 500ml prep bowls and serves 2-3.  However, as I found yesterday, it only serves one on a ‘drown your sorrows’ sort of day!

Mix 4 tbsp self raising flour, 4 tbsp sugar and 2 tbsp cocoa in a mug.

Add one egg and mix.

Stir in 3 tbsp milk, 3 tbsp vegetable/sunflower oil and a few drops of vanilla.  Feel free at this point to swap the vanilla for orange or mint extracts, add 2 tbsp of chopped nuts or chocolate chips or raisins or mini marshmallows or chunks of cookies.  Or all of the above! Go wild!

Stir.  Place in microwave.  Cook for 4 minutes.  Eat.

After Eight Croissant Pudding —

After Eight Croissant Pudding

After Eight Croissant Pudding

3 butter croissants

8 After Eight mints, roughly chopped

250ml semi skimmed milk

150ml half fat thick cream

2 medium eggs

¼ tsp vanilla extract

2 tsp golden caster sugar, for the top

To serve; 1tbsp icing sugar for dusting

Method

Preheat the oven to 180°C. Grease the Mini Baker if new.

Cut the croissants into bite sized pieces and arrange in the dish, scattered with the After Eight mints.

Beat the milk, cream, eggs and vanilla in the Classic Batter Bowl.

Slowly pour the mixture over the croissants and sprinkle with sugar.

Bake for 25 – 30 minutes until the custard is softly set (has a slight wobble) and the top is puffy and golden. Dust with icing sugar and serve warm.

This is fabulous when made with slices of Panettone instead of croissant. You can prepare it a little in advance and keep in the fridge until ready to bake.

You may wish to double up on the quantities and make in the Square Baker, depending on numbers/how hungry you are!